
Home » RTV5 User Guide |
RTV5 User Guide
Detailed Installation Instructions Are Included With Each RTV5. You Can Also Download The Instructions Here: RTV5 Install Instructions
Once you have installed your RTV5 and are ready to activate, please complete, sign and return the C redit Card Authorization form to us. The form can be scanned and emailed to us at info@liveviewgps.com or simply faxed to 1-800-557-4314. When we receive this form back we will activate your account.
Once activated we will email your username, password and login URL. Billing shall commence on the day of activation, and the first month's charges are pro-rated at $1 per day. Your credit card will be automatically charged on the 1st of every month, until service is cancelled. There are no long term contracts, service cancellation requests must be received prior to the 25th day of the month.
With the username and password assigned to you, goto the RTV5 Portal and click the link. A screen similar to the one shown below will appear on your screen:
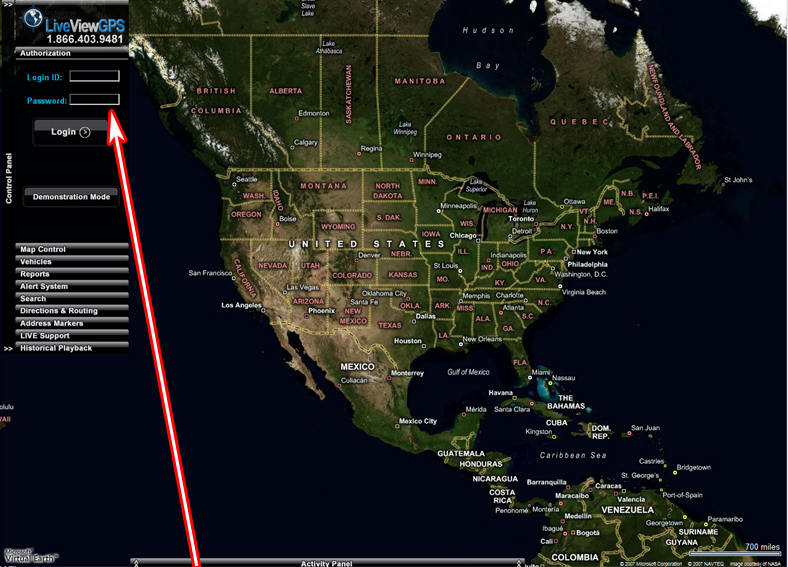
In the authorization window on the left side of the screen, enter your account number as provided to you by LiveViewGPS, as well as the password. Click the "Login" button.
Once login is complete, the map will immediately jump to your area and the location of your vehicle(s).
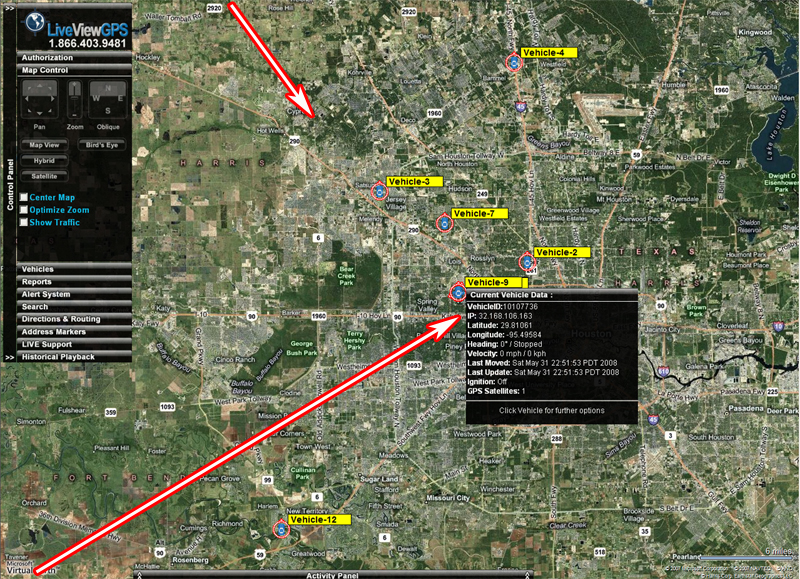
You may move your mouse over the vehicle to show specific information about the vehicle such as latitude, longitude, and the speed at which the vehicle is travelling. The location(s) of your vehicle(s) on the map are updated from the LiveViewGPS server every 10 seconds.
The tracking device itself gathers its location based on transmissions from a constellation of satellites; when the sky is partially obscured by a tunnel or tall buildings, you should expect a reduction in accuracy.
On the left side of the map screen you will find a Control Panel, providing tabs for Authorization, Map Control, Tracking, Reports, Alert System, Live Support, and Historical Playback. Clicking on any of these tabs will providing access to each group of functions.
You may select the “Map Control” tab from the control panel to the left, and the map control panel will open providing controls to zoom, pan, and set map rendering options.
The LiveViewGPS system relies on Microsoft Virtual Earth Maps to provide maps of the coverage area. In larger metro areas, high-resolution aerial images are available; in more rural areas, aerial imagery may not provide the same level of detail as larger metro areas. If you live in a rural area, you may find it more useful to select “Map View” instead of Hybrid view.
When fully zoomed, the maps provide detailed street-level information, enabling you to see the precise location from which the car is reporting. When zoomed out completely, you have a complete view of the world.
The "Center Map" checkbox, when enabled, will automatically center the map on a single vehicle (selected under the tracking tab), or on the center of a group of vehicles. "Optimize Zoom" will zoom as closely as possible while still keeping the group of vehicles on the viewable map at once.
By default, your login will show ALL the vehicles associated with your account - up to a maximum of 512 vehicles onscreen at once. In viewing all vehicles, you manually control the area of the map you wish to view by using the zoom and pan features to move the map within the viewport. In order to select an individual vehicle, you may select the ‘Tracking’ tab from the control panel, and select a specific vehicle from the dropdown list.
Selecting a single vehicle from the dropdown list on the tracking tab enables you to turn all other markers off, enabling quick isolation of the target from among a large fleet of vehicles.
This feature is often used in conjunction with the "center map" checkbox on the map control to "follow" a vehicle wherever it goes. Individual vehicle selection is also used to specify which specific vehicle to replay under the historical playback control. Specifying a single vehicle to track has implications under a number of different controls. Check each section of the manual for the impact of individual vehicle selection on each function.
When a report is selected from the Reports control, a semi-transparent overlay appears over the map. Note that the vehicle markers continue to move, always reflecting their locations on the map beneath. On the reports overlay, you may select the specific parameters used for the selected report.
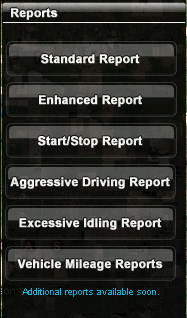
When reading a report, you will typically see a series of date/timestamps, along with the physical address (or lat/lon, if the vehicle is continuing along a more-or-less straight course), as well as vehicle speed and heading. Headings are expressed in the range of 0 - 359, indicating the direction in which the vehicle is pointing. Zero is north; the value increments clockwise. Reports may be highlighted and copied/pasted into Excel spreadsheets.
Imagine, for a moment, that you're a homebuilder, HVAC installation contractor, electrical or plumbing contractor. You want to know what time your guys are arriving on the job site each morning... and what time they leave in the afternoon. With the Zone Alert feature of the LiveViewGPS system, you can easily define up to 20 "Alert Zones" (also known as "geo-fences") and the system can automatically notify you - by email or SMS text message (or both) - any time one of your vehicles enters or leaves the zones you define.
Defining Alert Zones couldn't be easier! First, zoom in on the area in which you want to create a zone notification. From here, it's as simple as clicking the Alert System control and selecting the option to "Show Alert Editor". A window similar to that shown below will appear on your screen.
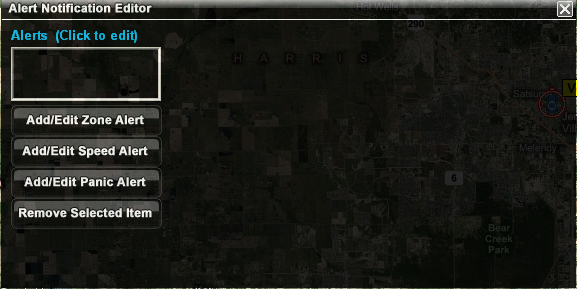
Click the "Add Zone Alert" button. In the first field, select a name for your zone, then click the "draw" button. Position the mouse pointer on the screen where you'd like to place the upper left corner of your zone, and click once and release. Move your mouse to the opposite (lower right) corner, and click again.
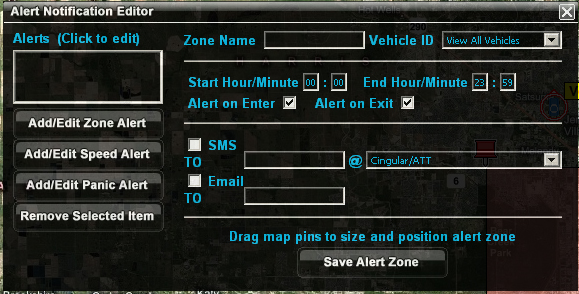
Select the notification method you prefer. You can have LiveViewGPS send an SMS text message to your cell phone, or an email to any address you specify. When you've finished specifying the email address or SMS address, simply click the option to "Add GeoFence Alert Zone", and the zone you've created will be added to the list at the left. It's that easy!
With a correctly defined zone, you receive notification any time a tracked vehicle enters or leaves the area you've specified. Zones can be removed by simply highlighting the zone in the list, and clicking the "Remove" button.
To ensure reliability, it's a good idea to draw your Zone Alert slightly larger than the specific house or lot itself to accommodate occasions where the vehicle might go near the zone but park slightly outside the geo-fence.
The Speed Alert is a close relative of the Zone Alert. Speed Alert enables you to define speeds at which you are notified. Speeds can be defined for specific vehicles, or for all vehicles in your fleet. Any time one of the specified vehicles exceeds the defined speed, the LiveViewGPS system will notify you with an SMS text message to your cell phone, an email, or both.
From the same Alert Editor Window, Select the option to "Add Speed Alert". Specify a name for your alert (so that you can reference it later in the list at the left), and select whether you want the alert notification to apply to all vehicles or a specific vehicle by selecting a vehicle from the dropdown list. Fill in the Speed in the next field, and you're almost finished.
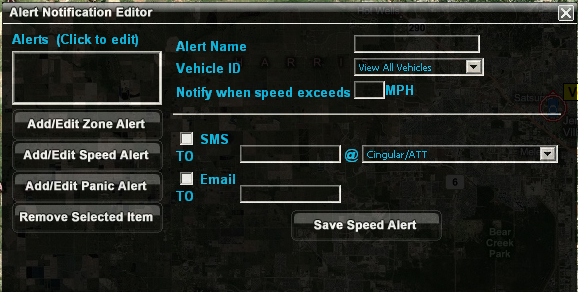
Check the appropriate box and populate the fields for SMS text message or email notifications (depending on the notification method you prefer), and select the option to "Add Speed Alert". You'll see your alert added to the listbox at the left.
Speed alerts are easily removed by selecting the item in the Alerts list on the left side of the Alert Editor Window and clicking the "Remove" button.
When you are finished creating or editing Alert Zones and Speed Alerts, click the [X] at the upper right corner of the Alert Editor Window to close it and resume normal operations.
Like Zone and Speed Alerts, when wired with an optional panic button, the RTV5 has the capability to instantly send alerts to any cell phone or email address when the panic button is pressed. (For panic button wiring see installation instructions)

The Address Manager exists to enable the placement of user-defined markers on the map. These markers can provide quick, easy location of warehouses, offices, and other landmarks relevant to your daily use of the LiveViewGPS vehicle tracking system.
To access this feature, select the "Address Manager" tab and click "Show address manager".
After typing the name you wish to appear on the marker label, type the address into the address field and click the "Find Lat:Lon" button. The system will find the closest match in the database and populate the latitude and longitude with that location.
Alternatively, if you know the latitude and longitude (based on the position of a vehicle), you can simply type the latitude and longitude and click the "Find Street Address" button.
To place the marker on the map, click the "Add Address" button at the lower right corner of the Address Editor window. A target icon will appear at the location specified. When your mouse is placed over this target icon on the map, a small window will appear providing complete address information.
To remove an address marker, simply select that item in the list on the left side of the Address Editor Window and click the "Remove" button. When you are finished creating or editing your address markers, click the [X] at the upper right corner of the Address Editor Window to close and resume normal operations.
LiveViewGPS provides LIVE online chat support from within the vehicle tracking application itself.
With this advance, you can ask questions or be given direction on how to use specific parts of our system at the same time you continue to interact with the system. There is no need to close the chat window or go try something and come back. In fact, you can leave the Live Support window open even as you manipulate the map - zoom in, zoom out, pan the map, select an individual vehicle or all vehicles, or even run reports or historical playback.
No other vehicle tracking product on the market provides such an advanced level of technical support and assistance to the user community - because no other vehicle tracking company cares as deeply about the satisfaction of its clients.
To talk with a LIVE support engineer, simply select the LIVE Support tab on the control panel, and click the button labeled "Live Support System". A window will appear at the bottom of your screen similar to the one below:
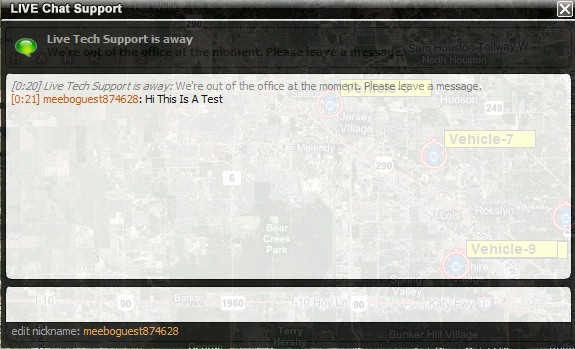
In order to chat one-on-one with a support engineer, simply type your question into the lower box, and hit "enter" when you're ready to transmit. The upper box will show the conversation between yourself and LiveViewGPS support.
Currently, we provide live online support between 8am and 5pm (Central Time) Monday through Friday.
The Historical Playback feature enables us to graphically reanimate the path taken by a specific vehicle based on historical (report) data.
Before we can begin an historical playback, we must first select which specific vehicle we intend to replay. To do this, select the vehicle from the Tracking drop down list. Once this is complete, select the Historical Playback control, and click on the date for which you'd like to see a playback. Finally, click the PLAY button on the top of the Historical Playback control.
Once the PLAY button has been clicked, the vehicle marker will begin reanimating the precise path taken on the date selected.

As with normal (live) playback, you may zoom or pan the map even as the playback continues to run. Likewise, you may mouse over the vehicle to see its speed at any point during the playback.
The playback will begin at midnight on the date selected and continue until the last record transmitted that day has been rendered. To terminate the playback and return to LIVE mode, simply click the STOP button.

Historical Playback In Map View
RTV5 Trouble Shooting Guide
By nature, any antenna placement will deteriorate signal reception even if only slightly.
If installed too far below the dash, the device may still function in areas where strong wireless data coverage is available. Despite the fact that it functions, such poor antennae placement may deteriorate signal quality from 5 bars to only 2 bars (hypothetical). In such an installation where the installation deteriorates signal quality by 3 bars, when your vehicle moves into an area where wireless data coverage only provides 4 bars of service, your device would have only 1 bar of service. Similarly, in an area where wireless coverage provides only 3 bars of service, your device would be unable to communicate due to signal deterioration based on poor antennae placement.
It is for this reason that a quality install and good antennae placement is critical.
Our objective is to install the antennae in a place where signal deterioration is kept to an absolute minimum.
1. The map shows my vehicle to be stopped, but the vehicle is moving...
Answer: This is caused by either of two potential issues :
A) The device is not transmitting
- poor (or no) wireless data coverage
- poor antennae location resulting in deteriorated wireless data signal
- antennae not plugged into device
B) The GPS unit cannot see the sky (If lat=0 and lon=0, the unit will not transmit)
- antennae facing downward (the embossed or printed text should face the sky)
- poor antenna placement (GPS antennae cannot see sky through metal)
- antenna is placed too far below the dash to have a good view of the sky.
- On a new install, it may take several minutes for the GPS to establish location.
NOTE: The unit transmits more frequently when the vehicle is moving.
- the device transmits every 30 minutes if the vehicle is stationary.
- the device transmits every 5 (or 10) seconds if the vehicle is moving.
2. The system shows my vehicle to be hundreds of yards from its actual location.
Answer: The GPS unit does not have a good view of the sky.
A) Under normal circumstances (with a good view of the sky) our devices are accurate to within 10-12 inches. There are 26 satellites in the GPS constellation. The more satellites the device can see, the more accurate the location.
B) when vehicles are parked facing tall buildings (or in indoor garages or under metal awnings) large portions of the sky are often obscured.
C) antenna placement is critical to ensure reliable and accurate operation.
3. When the device came on this morning, it showed the location from (another time).
Answer: The brown wire is not correctly connected to the accessory 12v (ignition) power source. When the device shuts down, it stores its last known location in a buffer. If the brown wire is not connected, the device cannot perform a graceful shutdown and thus cannot store its last known location properly.
4. My unit isn't sending me alert emails or sms text messages.
Answer: Your email server may have blacklisted. We've seen frequent cases where people request notifications from our server based on frequent alert cases (for example, 45mph). Thereafter, every time the vehicle exceeds 45mph, an email is sent. After 20-30 emails, your email server may delist or blacklist our email server because it believes our email server is spamming based on the sheer volume of notifications.
Check your spam folder to see if your email notifications are arriving there. Or contact us to further resolve this issue.
5. I click to zoom in (or out), but the system keeps zooming back out (or in).
Answer: The "optimize zoom" checkbox on the Map Control tab is turned ON. Turn the checkbox OFF and manual zoom control is returned.
6. I slide the map, but it keeps moving back to a different location.
Answer: The "auto-center" checkbox on the Map Control tab is turned ON. Turn the checkbox OFF and manual pan control is returned.
7. I log in, and all I get is a map of the US. My vehicle doesn't show.
Answer: In almost every case, this is because it's a newly installed device and the unit hasn't yet transmitted its first packet of data (and thus cannot appear on the map because we don't yet know its location). It generally takes approximately 5 minutes after a new device has been powered up to begin transmitting.
This process can be hastened by driving the vehicle. Under normal circumstances, the device transmits 10 seconds when the vehicle is moving, but only once every 15-30 minutes if the vehicle is stationary. For this reason, it could take up to 30 minutes to make its first transmission if the vehicle remains stationary.
RTV5 DEVICE DIAGNOSTIC CODES:
The RED LED will blink on the front of the device if a problem is encountered. Below are the diagnostic codes describing each of these error conditions :
1 blink - The modem is not detecting a SIM card.
2 blinks - The modem is not detecting a cellular signal. Check antenna connection, check with a known-good antenna.
3 blinks - The GPS receiver is not tracking any satellites. Check antenna connection and placement.
4 blinks - The modem has no cellular signal AND GPS is not tracking any satellites. See items 2 and 3 (above) for troubleshooting.
5 blinks - The modem is not detecting a SIM card and GPS is not tracking any satellites.
6 blinks - The modem is not responding, and may be defective or incorrectly configured within the firmware. Contact us for further diagnostics.
7 blinks - The modem is not responding and may be defective and GPS is not tracking any satellites. Contact us for further diagnostics.
8 blinks - GPS is OK, but the modem is not registered on a network. Contact us for further diagnostics
9 blinks - The modem is working correctly, and GPS is tracking satellites, but GPS is not making position fixes. The vehicle or the antenna may need to be repositioned for a good view of the sky.
| GPS PRODUCTS | |
|
|
| GPS TRACKING FOR VEHICLES, CARS & AUTOS |
| PROFESSIONAL & PERSONAL GPS TRACKING |
| GPS ASSET TRACKING |
| GPS TRACKING FEATURES & BENEFITS |
| ARCHIVES |